Dynamic SSO code explanation
Introduction
This Document explains SSO code developed by aiv. In this document, we have explained each method of SSO help user to understand. Also we have demonstrated here how users and roles can be created dynamically.
With Normal SSO, signed in user is checked against list of user available in aiv user table. There might be client required that if loged in user in thrird party application not exist in aiv then read user and role details from URL and add user and assign role in aiv automatically.
Considering this scenario we have made change in a SSO code to add users and role dynamically.

Prerequisites
Downloaded Sample project from Here..
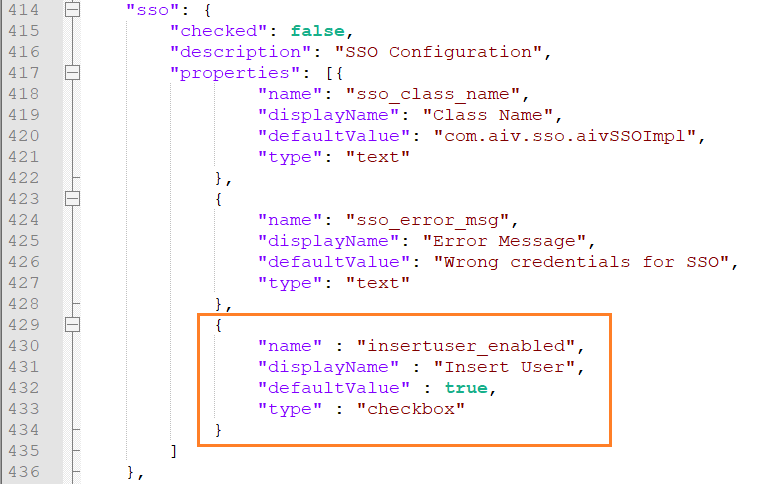
insertuser_enabled should be added in config.json file inside sso property. If you do not find this property in you cofig.json file, please copy property from below;
{
    "name" : "insertuser_enabled",
    "displayName" : "Insert User",
    "defaultValue" : true,
    "type" : "checkbox"
}
Code Explanation
The code starts with importing required dependencies as shown in below code snippet.
package com.aiv.sso;

import java.io.IOException;
import java.util.HashMap;
import java.util.Map;
import java.util.logging.FileHandler;
import java.util.logging.Handler;
import java.util.logging.Level;
import java.util.logging.Logger;
import java.util.logging.SimpleFormatter;

import javax.servlet.ServletRequest;
import javax.servlet.ServletResponse;
import javax.servlet.http.HttpServletRequest;
import javax.servlet.http.HttpServletResponse;

import org.apache.commons.io.IOUtils;
import org.json.JSONException;
import org.json.JSONObject;

import com.activeintelligence.external.sso.SSOSecurity;
Below code is to initialization of java logger. In Java, logging is an important feature that helps developers to trace out the errors. Java is the programming language that comes with the logging approach. It provides a Logging API that was introduced in Java 1.4 version. It provides the ability to capture the log file.
Here we have initialized logger and provided path where this log file will be stored
public class aivSSOImpl implements SSOSecurity {
    private static final Logger logger = Logger.getLogger(aivSSOImpl.class.getName()); // init of logger
    private static final String LOG_FOLDER = "C:/aiv/logs/";
User can configure logger settings by using below code. For example, logging level, components, Logging handlers or appenders, logging formatters or layouts, Java Logger class.
    public aivSSOImpl() { // to read external settings if any
        try {
            Handler fileHandler = new FileHandler(LOG_FOLDER + "sso.log", true);
            fileHandler.setLevel(Level.ALL);
            fileHandler.setFormatter(new SimpleFormatter());

            logger.addHandler(fileHandler);

        } catch (IOException e) {
            logger.severe(e.getMessage());
        }
    }
Below code snippet contains business logic for user authentication. It has logic to grab username, Department and token from client application URL and authenticate with list of users available in aiv database. It will allow user to access aiv when found a match case.
Here we are providing default user and role options if user not found in aiv and insertuser_enabled property is marked as true in config.json file
    @Override
    public Map<String, Object> authenticate(ServletRequest request, ServletResponse response, String extraInfoIN) { // for
        logger.info("Inside SSO");                                                                                                      // external
        HttpServletRequest req = (HttpServletRequest) request;
        Map<String, Object> rtObj = null;
        String userName =null;
        String userToken = null;

        String str = null;


        try {

            str = IOUtils.toString(request.getInputStream());
            JSONObject jsonObj = new JSONObject(str);
            userName=jsonObj.getString("userName");
            userToken=jsonObj.getString("token");
            Map<String, Object> userOptions = new HashMap<String, Object>();
            userOptions.put("firstName", userName);
            userOptions.put("lastName", userName);
            userOptions.put("userName", userName);
            userOptions.put("status","Active");
            userOptions.put("password", "");
            userOptions.put("email", "sample@gmail.com");
            userOptions.put("homeFolder", "/"+userName);
            userOptions.put("backupUserId", "1");
            userOptions.put("managerUserId", "1");
            userOptions.put("adhocOption", "1");
            userOptions.put("dashboardOption", "1");
            userOptions.put("alertsOption", "1");
            userOptions.put("reportOption", "1");
            userOptions.put("mergeReportOption", "1");
            userOptions.put("resourceOption", "1");
            userOptions.put("quickRunOption", "1");
            userOptions.put("mappingOption", "1");
            userOptions.put("messageOption", "1");
            userOptions.put("datasetOption", "1");
            userOptions.put("parameterOption", "1");
            userOptions.put("annotationOption", "1");
            userOptions.put("notificationOption", "1");
            userOptions.put("requestOption", "1");
            userOptions.put("adminOption", "0");
            userOptions.put("scheduleOption", "1");
            userOptions.put("userType", "INT");
            userOptions.put("default_dashboard", null);
            userOptions.put("landing_page", "Documents/Reports");
            userOptions.put("locale", "en");
            userOptions.put("timezone", "SYSTEM");
            userOptions.put("notification", "1");
            userOptions.put("theme", "Default");
            userOptions.put("department", "Default");
            logger.info("Inside userOptions SSO");


            Map<String, Object> roleOptions = new HashMap<String, Object>();
            roleOptions.put("description", "");
            roleOptions.put("email", "sample@gmail.com");
            roleOptions.put("dashboardOption", "1");
            roleOptions.put("alertsOption", "1");
            roleOptions.put("reportOption", "1");
            roleOptions.put("mergeReportOption", "1");
            roleOptions.put("adhocOption", "1");
            roleOptions.put("resourceOption", "1");
            roleOptions.put("quickRunOption", "1");
            roleOptions.put("mappingOption", "1");
            roleOptions.put("messageOption", "1");
            roleOptions.put("datasetOption", "1");
            roleOptions.put("parameterOption", "1");
            roleOptions.put("annotationOption", "1");
            roleOptions.put("notificationOption", "1");
            roleOptions.put("requestOption", "1");
            roleOptions.put("adminOption", "0");
            roleOptions.put("scheduleOption", "1");
            roleOptions.put("department", "Default");
            logger.info("Inside roleOptions SSO");
            if (userName.equals("Admin") && userToken.equals("S3CUR3T0K3N")){
                /*
                * put your own Authenticate logic to verify userName, password and Token. In
                * the below we are matching username and token and returning object value
                */
                logger.info(userName + "|" + userToken + "|");
                rtObj = new HashMap<String, Object>();
                rtObj.put("userName", userName);
                if(jsonObj.has("deptCode")) rtObj.put("deptCode", jsonObj.getString("deptCode"));
                HttpServletResponse res = (HttpServletResponse) response;
                res.setHeader("tokens", userToken);
                if (str != null) {
                    rtObj.put("requestValues", jsonObj.toString());
                }
                return rtObj;
            }
            else {
                rtObj = new HashMap<String, Object>();
                rtObj.put("userName", userName);
                logger.info(userName);
                if(jsonObj.has("deptCode")) rtObj.put("deptCode", jsonObj.getString("deptCode"));
                if (str != null) {
                    rtObj.put("requestValues", jsonObj.toString());
                }
                rtObj.put("userOptions", userOptions);
                rtObj.put("roleOptions", roleOptions);
                rtObj.put("assignedRole", "Administrator;example@gmail.com,Test2;example2@gmail.com");
                return rtObj;
            }
        } catch (IOException | JSONException e1) {
            // TODO Auto-generated catch block
            e1.printStackTrace();
            return null;
        }

}infoProperty to update,
userOptions.put("email", "sample@gmail.com"); -> Provide a valid email id for email key.
roleOptions.put("email", "sample@gmail.com"); -> Provide a valid email id for email key.
Here value 0 represents No Access, 1 represents Read only Access and 2 represents Full Access. by default we have provided read only rights for all sections for user created dynamically.
Admin user can alter the settings if required from user section afterwards
- rtObj.put("assignedRole", "Administrator;example@gmail.com,Test2;example2@gmail.com");
- user roles ane email id for role need to be provided as shown above. this code will be found at line number 141. role & email id can be sent as key-value pair seperated by semicolon.
Test end to end flow
Code provided here is used to validate userName, deptCode and tokens from Embed URL. If user has third party application and he wants to display dashboard in to his application, aiv has feature of embed link of dashboard. user can use this dashboard embed link in his application in iframe. but this embed link required user name, password or session token to be validated while dashboard is called with embed link. with invalid user credential dahboard will not open in iframe.
To load dashboard in iframe, user need to send user name, password, department name and session token in URL and aiv will validate user credentials with SSO code provided above. This is basic sso code and user can apply his own logic to validate valid user.
Here we use userName, deptCode and Static token to validate valid user of aiv.
Let's configure this code and check working of sso user verification code by using sample embed link of dashboard for Admin user.
From Prerequisites, download sample project and you will find sample sso project folder in this zip.
Extract this project and open this project in eclipse IDE.
Open aivSSOImpl.java class from src/com.aiv.sso/ project path.
Go to Code line no 25 in eclipse and change folder path of logs folder. refer step number 6 of SSO & External security document.
Save this changes and make sure there is no errors in project.
infoIf you are facing errors in project after importing in to eclipse, go to build path and change external and Mysql jar path. both jar file is attached with sample zip project you have downloaded.
Right click on aivSSO project and click on Export option to create a jar file
Select JAR file from the export window and click on next
provide jar file export path and name of jar file.
infoJar file name should not be external.jar as it is already used by aiv
Stop tomcat server if running and place this jar in at (your_directory)/aiv/tomcat/webapps/aiv/WEB-INF/lib/ folder.
Restart tomcat server.
Login to aiv application and click on SSO Configuration check box, it will enable SSO Configuration setting into aiv, as shown in figure.
Enter in class name:
com.aiv.sso.aivSSOImpl, as shown in figure. [It impairments SSO Jar File class path]Click on save button to save the changes.
Go to dashboard section and generate embed link of any working dashboard without bypass option.
infoTo know more on how to generate embed link Click here..
Copy this embed URL and paste it in any text editor application. Provide password at
&a_p__and static token at&a_t__. (static token we have used in sso code : S3CUR3T0K3N) in copied embed link.
User can change in sso code to get toekn dynamically.
For example,
http://localhost:8080/aiv/embed/external/31767950674266325a554a743438647a6e7a4e374a4542777a67726650585833656d356d4f704f54587077253344/a_u__Admin&a_p__password&a_t__S3CUR3T0K3N&a_d__Default&a_ex__&a_af__false/noparam
Run this embed link in Browser and dashboard will be displayed if user credentials are valid. SSO code will get credential details from embed link and validate with aiv user details and allow dashboard to load.
In case user passed with embed link is not available in aiv, when executing this embed link browser, aiv automatically create user and assign role to user. then after dashboard will be displayed for that user. this whole process is completed on fly without any extra effort.
To understand this scenario, use above embed link and change username and password and make sure user name you are entering is not available in aiv.
Execute this Embed link in browser and you will see same dashboard open for that user. In order to verify user is created in aiv, Login to aiv with Admin user and check user and role is created from Administration section.
infoIf you facing issue on dashboard loading please email on support@aivhub.com